
Confession time… this is my third attempt for turning my seemingly good idea at the time into something really good. Normally, I get an idea in my head, run with it, and the end result, I’d say 80% of the time is what I was expected. Sometimes it is even better, other times… well.. how can I put it without sounding too critical… was ‘okay’. My brain is wired quite simply. I think… ‘what do I like?’ and the rest is an adaptation of one form or another. I really like good bread. I also love savoury bread. Finally, I like to try making new things I have not experienced before. That is my process.
I am more than happy to explain what went wrong with previous recipes, just so you don’t have to repeat the same mistake. There was nothing wrong in my choice of ingredients, just how I chose to incorporate them. Oh, and timings. So, in case you think I am off my rocker, Herbes de Provence, Red chilli, black olives, and red and white onions work really well. What does not though is: shoving them into the dough too soon, or without drying out the red onions and chilli first.
My final lesson learned – proving dough in Autumn is not the same to proving dough in Summer. The ambient temperature makes all the difference. This being the case, my approach had changed marginally – my kitchen’s room temperature (around 18C at the moment) is not sufficient – I have found a new home for proving – my storage cupboard which contains hot water tank and boiler. The temp? 23C-28C (depending on if the boiler has been running) – and where proving is concerned, what a difference. Right, for anyone who has managed to make it, I hope you really enjoy my recipe for Onion, Red Chilli, and Black Olive Bread with Herbes de Provence. Personally, I like it as it is – just warmed up with a drizzle of olive oil.
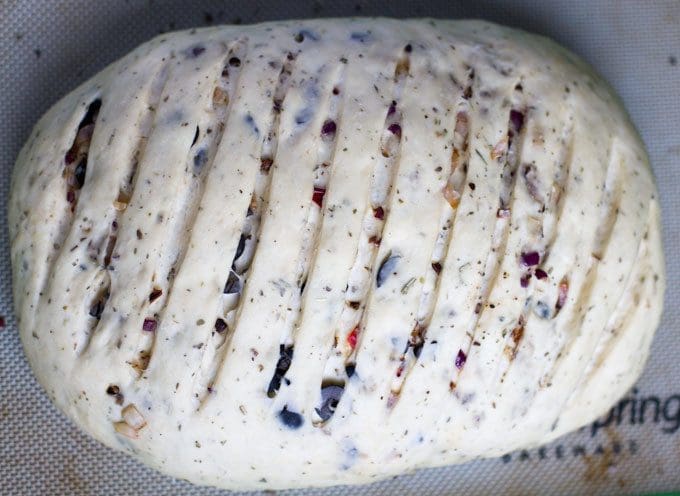
Proven loaf, just before going in the oven
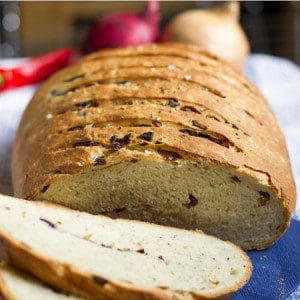
Onion, Red Chilli, and Black Olive Bread
Ingredients
- 500 g Strong White Flour
- 7 g fast action yeast
- 1 tsp sea salt
- 1 tsp caster sugar
- 275 ml warm water
- 3 x tbsp olive oil
- 2 x tsp Herbes de Provence + a little extra for the crust
- 1 x medium red onion finely diced
- 1 x medium white onion finely diced
- 1 x red chilli deseeded and finely sliced
- 1 x handful of pitted black olives drained and dried
- 1 x tsp balsamic vinegar
- 1 x tsp coarse sea salt - Gros Sel de Guérande is my favourite
Instructions
- Combine all the dry ingredients (flour, yeast, salt, Herbes de Provence and sugar) in a large mixing bowl, and mix thoroughly using a bell whisk.
- In a measuring jug, add hot (from the tap) water to the 275ml line. Next, add 3 tbsp of olive oil to the mixture and stir thoroughly.
- Then, create a well in the middle of the mixture and slowly pour about one-half of the liquid. Using a silicone spatula or wooden spoon, start to fold the dry ingredients into the liquid. Then, gradually add the liquid, and keep folding together until a dough ball is formed. You may at this stage find it easier to switch your your hands, or a hybrid hand and utensil approach which means that the dry and wet ingredients are being evenly distributed.
- Remove the dough from the mixing bowl, and knead for 5 minutes or so until the texture is no longer sticky, yet still elastic. You may need to sprinkle additional flour during this process, so keep some at hand. I use a silicone baking mat to knead on.
- Oil the same mixing bowl (saves washing up) with a small amount of olive oil, then return kneaded dough ball, cover with a tea towel or cling film for 1 hour, and allow to rise in a warm place. As I mentioned earlier, room temperature is no longer sufficient - I have found an alternative and consistently warmer location.
- Whilst the bread is proving for the first hour, it is time to prepare the other ingredients. Line and lightly grease a baking tray with kitchen foil, and preheat the oven to 170C. Then finely dice the red and white onions, and spread out on the baking tray. De-seed the red chilli, finely slice, and mix together with the onion. Drizzle over a little olive oil, balsamic vinegar, and season to taste. Bake in the oven for about 20 mins- stirring half way through. Once cooked (the onion will start to crisp) remove from oven to cool down.
- Meanwhile, drain the black olives and finely slice into rings. Remove excess moisture using kitchen paper.
- The dough should have doubled in size (maybe a little more). Remove the dough and flatten into a large oval. Then, evenly sprinkle the onions, chilli, and olives over the flattened loaf.
- Next tightly roll the dough from one side to another into a swiss-roll shape, then fold the narrower sides towards the centre. Manipulate the dough into an oval shape and place onto a silicone backing sheet. flatted the loaf, score with a sharp knife into shallow diagonal lines.
- Cover again with a tea towel, and allow to rise prove for a further hour in a warm place.
- Preheat the oven to 200C.
- Gently brush or spray olive oil over the top. Then, sprinkle on top a combination of sea salt (my favourite is Gros Sel de Guérande) - a natural coarse grey sea salt) and Herbes de Provence, and gently press them into the top of the dough with the palm of your hand.
- Bake in the oven for 30 mins. Once cooked, tun onto a wire rack and allow to cool.
- If you want to maintain an even softer crust, cover with a tea towel whilst the loaf cools down.
Notes
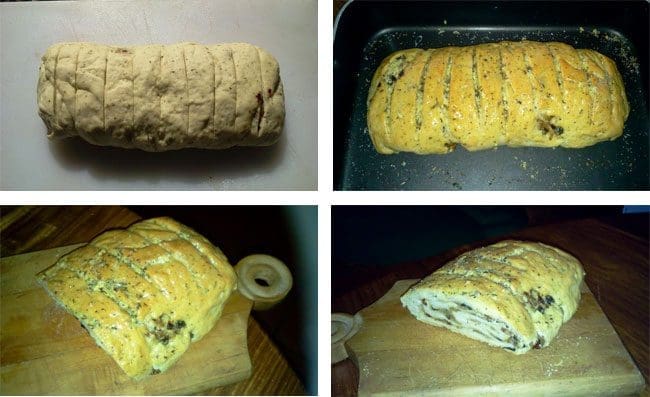
And here’s one Tersia Bekker made earlier
2015-03-20
It is one thing for me to cobble my own recipes and claim how good I think they are – it is another to have one of the followers of Love the kitchen get in touch and have a go making one themselves. Earlier this week, Tersia Bekker from Mozambique got in touch even before this bread had made it to the oven. I though as a new addition, why not hear someone else’s experience. I was really thrilled when Tersia shared the following story with me, complete with photos. I would be more than happy to have this as a regular feature.
In her own words
I am teaching here in Mozambique and the learners are writing exams now, thus from the minute I walk in at home to bedtime, I am marking, marking,marking!
The bread was absolutely divine…as you can gather from photo’s three and four (it was only my husband and I that did “verslind” the bread, together with pork and salad, in one sitting!! We sprinkled a bit of finely chopped garlic on top. The recipe works wonderful and we found that everything, e.g. the rising of the dough, happens as described in the recipe.
On Monday he only left me with three slices and the rest of what was left…guess…in his lunch tin! I One of the learners in my class, asks daily: “Mam, what are you having for lunch today?” (and usually his two friends are all ears to hear my answer) Well, I told and showed this divine bread to them…then offered them some, whereupon, they said that they don’t want to eat my lunch as I will go hungry. I assured them that I will survive should they leave me one slice, then left the class to fetch tea.
Returning to class, there wasn’t a crumb left! They now want to visit me so that I can bake them one as I am such an excellent baker!! “Yip,” I replied “we’ll do that BUT I am not going to bake it, I will teach YOU how to bake it!” We will be doing just that during the coming holidays.
WOW, this sounds and looks so delicious!! It’s been a while since I made bread… I will definitely be trying this out! Found you on FBP, by the way, and your photos are looking great!
Hey Raquel,
thanks for your kind words. Do let me know how you get on with the recipe. I find making bread to be one of the most therapeutic things. I’d love to see any adaptations/improvements too.
Your blog puts mine to shame BTW- I have a lot more work to do! All best. RB
Hi Richard
My husband and I am now putting this bread into the oven. So far….it looks divine!! Is there any way that I can send a photograph when it comes out of the oven?
Hi Tersia – I am so pleased that you found this recipe and I really hope that it turns out well ;o)
Please email me at: hello@lovethekitchen.co.uk and I will will extend my post to include your photo, and any other comments you wish to add.
All best.
Richard
I had the opportunity to try this ‘artisan’ bread last weekend. I am generally not a big fan of bread BUT this bread is amazingly good! Full of flavour. One doesn’t need to have spread on this bread, it’s already delicious on its own. But if you must, toast the bread, add goats cheese and a bit of tapenade…. Yummie!
Thank you for the recipe! I baked the bread yesterday, and it was delicious! I did bake it in a Dutch oven though, for 30 minutes, and it was perfect. My housemate said she could have like 5 slices in a go! Also, I added some roasted garlic to the recipe.
Hi Anete.
I am so pleased to hear that this worked out for you and your housemate. What a great idea to add roasted garlic.
I will be sure to try this myself next time. I will have to experiment with a Dutch oven too.
Thank you for sharing.
Delicious. Lovely flavour combo. Thanks for the recipe. Next time I will press the dough out a bit further to get a more even distribution of the onion, chilli, olive mix through the loaf.
Hi Jane, many thanks for your kind words – I am delighted to hear that it has worked out for you. This was very much one of my favourite bread recipes, used to woo the ‘wife to be’ some years ago ;o)
I am yet to try this as Sourdough – still very much on the bucket list.