
I have certainly let things slide at Love The Kitchen. My mojo and passion for cooking and writing has been largely traded with.. let’s just say, numerous challenges. Each and every one compounding on top of the next. To be honest, if I started the rant and raves which I am sorely tempted to vent about…. but will show restraint…. Donald Trump would think I met the adequate criteria of ‘embittered lunatic, devoid of all reality‘, hired me on the spot, and have me join team Rudy Giuliani and watch him lose the election. Again, and again, and again. To losing… the gift which keeps on giving. Then there is the competition: Who is Trump’s inner circle has not contracted Covid-19? In this perverse parallel universe (it seems) where those who denounce social distancing and refuse to wear covering are winning the prize of… Covid-19! So, whilst Trump lost the election, he stills get a second prize… of sorts.
Following the US election has offered the much required light relief needed during these troubling times. It is also a much needed distraction from the utter shite and misery that is going to befall on the UK from) 01 January 2021 – yes Brexit, the most incompetently and mismanaged mistake in my lifetime (maybe I should trademark this strap-line?) which really makes all my other issues in life pale into insignificance.
It is not all doom and gloom. I am one of the few to have something to be grateful for Covid-19 situation. In case you are asking, I am not a profiteer of the ultra corrupt cronyism rife inside Johnsons’s government handing out billions of pounds to pals and party donors who have neither experience nor competence to provide any life saving or protective equipment to the war against the pandemic. The situation did fortunately land me a job thanks to GetResponse‘s (based in Gdansk, Poland) very timely transformation into a remote-first company. I joined a really good team there (a shout out to Tomasz, Martin, Piotr, Irek, Sebastian, Ola and many many more), doing my first ever 100% remote job. Everyone at GetResponse has made me feel so welcome – a big thank you – and I really look forward to getting over there to meet my colleagues in the flesh (so to speak!). When, the madness is over. Oh, and if a UK passport actually empowers me to travel outside of the UK shores from January.
Chilli Tomato and Prawn Cuttlefish Ink Fettuccine Recipe
There was me saying I would not rant. Let’s get to the business of food! A little while ago, I was one of the many it seems who, earlier this year, in a moment of panic, decided to dust off their pasta machine and create survival food (if of course you could get flour). Marlini and I shared our adventure in our Fettuccine with Anchovy, Garlic and Lemon recipe. What we failed to do was to provide the ‘how to make fresh pasta‘ part, and now hope to redeem myself today. However, I fully appreciate that you may not have the time to jump into pasta making mode, and if you do, I have added the ‘Egg Pasta with Cuttlefish Ink Fettucine‘ recipe at the bottom of this post.
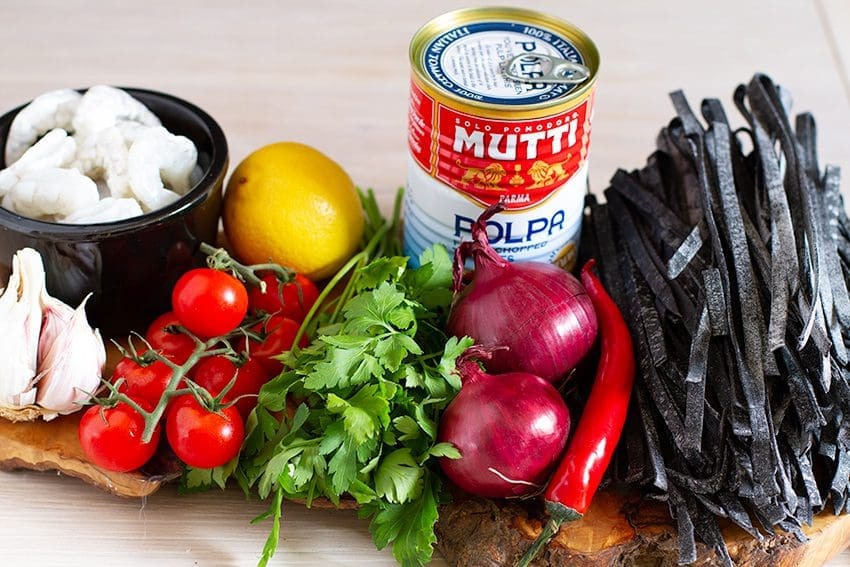
In reality, we make this dish quite regularly with dried pasta… and it works really well do. And please don’t be put off if you do not have all the ingredients. I have added a combination of fresh vine-ripened tomatoes and tinned tomatoes – purely because I like the combination of texture and flavours. If you do no have fresh chilli – try a few chilli flakes instead. I really hope you enjoy making (and eating) the Chilli Tomato and Prawn pasta as much as we have.


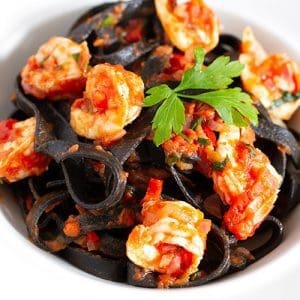
Chilli Tomato and Prawn Fettuccine
Ingredients
- 1 large red onion peeled and finely diced
- 2-3 large cloves garlic grated or crushed
- 4 medium vine-ripened tomatoes (optional) roughly chopped
- 250 g raw tiger prawns defrosted, and scored lengthways
- 1 large red chilli finely diced
- 400 g tin chopped Italian tomatoes
- 1/2 lemon zest only
- 1 sprig flat-leaf parsley roughly chopped
- 2 tbsp olive oil extra virgin
- 250 g fresh cuttlefish ink fettuccine or a dried alternative
- 1 tsp Maldon seas salt flakes
- freshly milled black pepper to taste
Instructions
- Bring a large saucepan to a moderate heat, add the olive oil, then the finely diced red onion and sweat for 2-3 minutes until softened.
- Add the grated garlic, lemon zest, red chilli, and vine-ripened tomatoes (if using) and cook for a further 3-4 minutes.
- Pour in the tin of tomatoes, stir thoroughly, season with freshly milled black pepper and Maldon sea salt flakes, and warm through, stirring occasionally.
- Whilst the sauce is cooking, carefully run a small sharp knife along the back of each raw tiger prawn (this will fan them out)
- Add the raw tiger prawns to the stir, cover with lid and simmer for around 5 minutes, or until the prawns are firm and cooked through then lower the heat.
- Bring a large pan of slightly salted water to the boil, add the cuttlefish ink fettuccine, and boil for 2-3 minutes.
- Using a pasta spoon, transfer the fettuccine pasta to the sauce, plus half a cup of pasta water and stir thoroughly. Add the fresh chopped parsley, stir through and transfer to warmed pasta plates. Enjoy.
Notes
If using dried pasta like linguine, you’ll need to allow 9-11 minutes depending on brand. It is always a good idea to take the chill off the pasta plates- you can simply use some of the boiling pasta water and leave for a minute or so and pour out before serving. Â
Egg Pasta with Cuttlefish Ink
There are many recipes online in terms of how to make fresh pasta dough…. after a couple of attempts (the first time mistakenly not flouring sheets of rolled dough adequately enough meaning that they stuck together) – we got better. It was also a great team effort in the kitchen for Marlini and I as we ventured into production line mode. Two relatively capable bodies makes this a lot quicker. The other point I wanted to make is that in so many other recipes we have seen they dollop a mound of flour on a surface, create a well, and drop the eggs in it- maybe it is my technique but it is one messy approach. Flour went everywhere – to the untrained eye, it could have used on the set of the cocaine fuelled film, Scarface. Credit for the basic recipe entirely goes to Marcato, we adapted the recipe to blend in the Cuttlefish Ink.
After first experimenting with a more standard egg pasta recipe (why run, before we can even crawl, right?) we were really keen to start to experiment and try more creative versions. We have made spinach pasta (another recipe for another time) but the type we really wanted to try at home was black Cuttlefish Ink Pasta (Nero Di Seppia in Italian) and were surprised by how easy this was to make. Thankfully, I didn’t have to grapple with an angry Octopus or similar- I can highly recommend Nortindal’s Cuttlefish Ink – it comes in a jar. It is very economical to use- one heaped teaspoon to make 500g of fresh egg pasta.


Egg Pasta with CuttleFish Ink Fettuccine
Equipment
- Pasta Machine
- Silicone Mat (optional)
- Pasta drying rack
Ingredients
- 250g g soft-wheat "00" flour sifted
- 250 g durum wheat flour (semolina)
- 250 g whole eggs and water approximately 5 eggs at room temperature
- 1 tsp cuttlefish ink heaped
Instructions
- Weigh the eggs and add a little water (if required) to make up to 250g. Pour into a blender, add the cuttlefish ink, and blitz for a few seconds.
- Sift both the "00" soft-wheat flour and durum wheat into a bowl, make a well in the centre, and pour in the egg/cuttlefish ink mixture. Mix thorougly with a fork to thorough blend together.
- Knead dough with hands until completely smooth and consistent for about 5 minutes. If too try, add water. If too wet, add more flour. Perfect dough should never stick to your fingers.
- Once you have a firm dough ball, dust with flour, put in a plastic bag and refrigerate for 30 mins
- Remove from refrigerator, and place on silicone matt. Roll into a fat squared suasage shape, and divide evenly into 6-8 pieces. (this will dictate the length and width of the pasta). Flatten each piece to slightly less than the width of the paste roller, and dust liberally with semolina flour. This is a really important step as it prevents the roller from clogging up.
- Set the adjustment knob on the pasta machine to '0', turn crank handle clockwise, and feed piece of dough through the rollers.
- Lightly dust both sides of pasta sheet again with semolina flour, and fold pasta in half. Feed again twice until the shape is log and regular. Cut the pasta sheet in two, and dust again with semolina.
- Lightly dust surface (I use a large non-stick silicone rolling matt) with semolina flour, ready to place the rolled pasta sheets on top.
- Set adjustment knob to position 1, pass pasta sheet once more, then set to 2 pass pasta sheet through again and continue incrementally until you reach position 6.
- Carefully place sheet on previously dusted surface, and dust with more semolina flour.
- Repeat until all sheets have been rolled to knob adjustment position 6. You may want to square of the ends of the pasta sheets with a knife so that each piece is more even.
- Transfer the crank handle to the cutting accessory (in my case, Fettuccine), and feed the pasta sheet through the roller to cut it.
- Pick up the pasta using a rod , and carefully transfer it onto one of the arms of the pasta drying rack. Ensure you allow a little space between the cut pasta ribbons to stop them sticking together.
- Allow the pasta to dry for about 1-2 hours (depending on temperature and humidity), and store if not using at the same time, store in a large ziploc bag and place in a refrigerator.
Notes
- Do not use cold eggs out of the fridge.
- Salt should not be added to the dough.
- When you cook fresh pasta, put in a large pan of salted water.
- Freshly cut pasta can be frozen, but always consume within a month.
OK, so now you can make your own fresh egg pasta. I really hope that it is a tick in the box for you. If you do not have time, space, equipment or patience to make your own pasta, this recipe works just fine with dry pasta as well.
Very delicious 😋